Thursday, June 20, 2013

Gluten free living: labels labels labels

Hey, I'm back! Sorry for a little while without posting, I've been doing normal fun summer kid stuff. like swimming every day, scaling some rock climbing walls, jumping on trampolines, and other fun activities! 


Today I'm talking about 
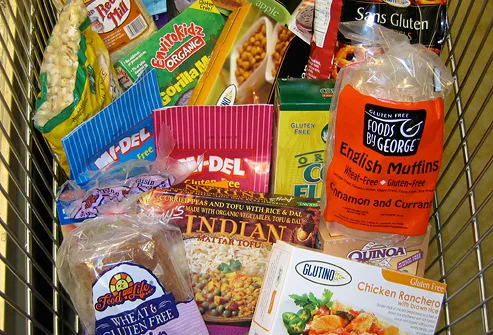
ingredient warnings. Usually, products have a warning like WARNING: CONTAINS WHEAT. Now, just because a label does not say this, doesn't mean it's GLUTEN-free. Read through the ENTIRE list of ingredients to make sure it also doesn't have barley, rye, oats, or granola, all gluten-containing. Some packages don't have ANY warning, so, if you don't know, check. If you're unsure, check and double check. If you're sure, but it's not one of the listed GF brands with which you are familiar, check again, because sometimes ingredients change.

That's not the only warning  ('contains wheat'). There are also the warnings MAY CONTAIN and MAY CONTAIN TRACES OF. Here's what you should do:

MAY CONTAIN: Best not to risk it. Don't have it, unless you have some gluten enzyme pills and you do not have severe symptoms from being glutened. These pills help break down gluten before it reaches your stomach. HOWEVER, don't go thinking, “Gluten-free? Whatever. I have these pills, so now, once again, I CAN EAT ANYTHIIIIING! MWAaahahahahah...” No. They are not 100% confirmed and still in the works, so only use them on the “may contain” warnings, if you really want to eat the product or have no other choice. They're expensive, though...just to warn you.

MAY CONTAIN TRACES OF: Again, best not to risk it... you still want to keep your risk of ingesting gluten to zero.

Keep in mind this definition from Celiac.com:

Celiac.com 03/29/2006 - "Gluten-free" as defined by the Codex Alimentarius, a Geneva-based international organization that is jointly run by the World Health Organization (WHO) and the Food and Agriculture Organization (FAO) of the United Nations, is defined as follows:
Section 1.1: “This standard applies to foodstuffs and ingredients which have been especially processed or prepared to meet the dietary needs of persons intolerant to gluten".
It goes on in section 2.1 to state that “Gluten-Free” foods are food stuffs so described:
  • a) Consisting of or made only from ingredients which do not contain any prolamins from wheat or all Triticum species such as spelt, kamut, or durum, wheat, barley, oats, spelt or their crossbred varieties with a gluten level not exceeding 20 parts per million (ppm): or
  • b) Consisting of ingredients from wheat, rye, barley, oats, spelt or their crossbred varieties, which have been rendered “gluten-free”; with a gluten level not exceeding 200ppm: or
  • c) Any mixture of the two ingredients as in a) and b) with a gluten level not exceeding 200ppm.

That's all for this post, hope it helps clear up some label confusion next time you are shopping! ;)

Wednesday, June 12, 2013

Gluten Free Lunch Ideas for Kids

One question that I get asked all the time is: What do you take in your lunch?  

One thing about being a Gluten Free Kid, as you know, is that you pack a lot of lunches for school. I have never had anything from the school cafeteria! This means what I like to take for lunch goes in cycles. I get bored with some thing, try new things, and of course new cool products come out all the time in the gluten free world. {See a list here of Gluten Free products}

This last year, some things I like to take include Cheetos, a sandwich on gluten free bread (Rudis or Udis), gluten free chips, Stagg chili in a thermos, a Tillamook yogurt, Motts applesauce, an apple or banana, and a couple of Glutino cookies. 


But there are many more products, like pretzels, soup, crackers, and other things you could take. You could take frozen yogurt, Gogurt, soup or chili in a thermos, make your own gluten-free lunchables, pack some carrots and other vegetables/fruits, leftovers...there's tons of things you could take...here's a list of categories with examples of food you could take in a lunch.


Note: Remember to always check ingredients, even if you've bought it before, because sometimes ingredients change. Also, if it says “produced in a plant that also produces wheat” or something along those lines, it is not guaranteed to be gluten-free, unless it says something like “product contains less that 500 ppm of gluten,” meaning that 1 particle in every 2,000 can be a gluten particle, which is safe. Some things are also never gluten-free unless you buy gluten-free varieties. For example, only gluten-free labeled soy sauce is actually gluten-free, and for some reason, blue cheese is also not on the Celiac approved list.


Dairy (keep cold with an ice pack)


  • Yogurt
  • Greek Yogurt
  • Frozen Yogurt
  • Cottage Cheese
  • String cheese
  • Sliced cheese


Chips, Crackers, and Stuff


  • Pretzels (Glutino ones are good)
  • Cheetos
  • Chips like Lays
  • Crackers
  • Cracker “Sandwiches” with peanut butter, or meats/cheese
  • Cookies (Pamelas, Glutino, Mi-Del)


Hot (In A Thermos)


  • Soup
  • Chili:
  • Baked beans


Cold (Can Be In A Thermos or other container with an ice pack)


  • Enchiladas (See the recipe here)
  • Other leftovers


Gluten-free “Cheats”

  • Lunchables” made with gluten free crackers, meat, cheeses and add a Glutino oreo-like cookie


Produce


  • Fruits
  • Vegetables
  • Salad with the dressing in a separate container


I hope this gives you some ideas to start packing your own gluten free lunch. There are so many more options than the ones I list here, so these are just a few to get you started. They work for camp or school. Having Celiac does not mean you have to miss out on great, yummy lunches.


Friday, June 7, 2013

Guide to Gluten Free Brands

     Today I thought I would switch gears and answer some reader questions. I have been asked what brands are the best gluten free brands or are even gluten free at all. Here's a list of my favorites (this doe not include every gluten free product on the market, just the ones available to me and that I like):


Source


Now that I have shown you some of the gluten free brands out there, I will post next some ideas for lunches, since this is the most popular question I receive.


Wednesday, June 5, 2013

Eating Out Part 2: Batch Cupcakes (and Tips for Taking Treats to Parties)


A couple of weeks ago, we went to a local cupcake bakery, Batch Cupcakes. The week that we went, they had made two delicious varieties of gluten-free cupcakes, Pumpkin and Chocolate. Usually, I have to get cupcakes from the frozen section at Whole Foods, but this cupcakery offers gluten-free cupcakes that are FRESH. They completely sanitize their equipment in order to be sure there is NO contamination. Then, they bake several batches of gluten-free cupcakes that they bake on Friday, Saturday and Sunday. Once they are sold out for the week, you have to wait for the next week's complete kitchen cleaning and baking of gluten-free cupcakes.


If you are a Celiac kid like me, there are some great tips for gluten-free cupcakes. First of all, if you are lucky enough to have a bakery in town that can guarantee their cupcakes to be free from contamination, then you can buy several, and freeze them individually in plastic bags. Then, if you are invited to a birthday party or an event or restaurant where there is dessert being offered that is NOT gluten-free, you can take along a cupcake. Just be sure to defrost it several hours on the counter before you want to eat it. This way, you also get to eat dessert with everyone else! If you don't have a local gluten-free bakery, don't worry. Places like Whole Foods sell gluten free cupcakes and muffins {and they are really good} in their frozen bakery section for all gluten-free baked goods. Just put those in your freezer to keep on hand.

I would say that the Batch cupcakes were very very yummy. Even the people in my family that do not have Celiac really enjoyed them {although I hate to share. Also, we used a Groupon so we got a really good deal on a dozen}.


Here's me eating a cupcake:


Have a delish gluten-free day! School is out for the summer so I am sure every day will be a good day.


Saturday, June 1, 2013

Review: Gluten-Free Cinnamon Raisin Granola Cereal by Enjoy Life

     Hey, sorry I haven't posted. I've been busy with the end of the school year, but it ends Wednesday, so then I'll be back on track with posts.  Lots of ideas for lunches, camps, parties, and product reviews. Be sure to add me to your favorites, follow me, and check back often. If there's anything you want me to write about, tell me in the comment section.

     This in the first in my REVIEW series where I take different gluten-free products, try them out, and let you know what I think. You can feel free to add your feedback on the product if you have tried it as well or if you know other products that I could try.


    Anyway, today I'm reviewing the cinnamon-raisin granola cereal that was sent to me a while back. That post is here in case you missed it.


Here's a picture of the package:


Inside the package:


And me eating it (delicious):

     Overall, very tasty, but I can't compare it because I've never had any kind of 'regular' granola. My mom, who's had both, says that the gluten-free granola is a little more crunchy and hard than other granola, but still was really good.


    What kinds of gluten free products have you tried for breakfast? 

(I was not paid or compensated in any way for reviewing this product. This was something I tried on my own from a box of items a reader sent me from her own kitchen cupboard.)

Sunday, May 19, 2013

The BEST Green Chile Chicken Enchiladas Ever, Gluten Free Of Course!

Hello again! Today, I'm making my mom's friend's recipe she made up 20 years ago. Let's get started.

Read through the recipe first, gather your ingredients, and then preheat the oven to 350 degrees. We use convection bake but regular bake is fine also.


Here is the flour I use:

Here is the pan we will be using. Grease the bottom with some butter or oil spray (don't use PAM, as it makes it taste weird). If you need it, ask a parent to help on this part.


First, get 2 cups of chicken and combine it with 1 cup of shredded cheese. My mom buys a whole chicken and cooks it on the stove for hours with spices and vegetables. She then reserves the broth and shreds the chicken.


Take a dozen or so gluten-free corn tortillas; most corn tortillas are gluten free, but not all, so check the label. Then, wrap them in a paper towel and microwave for 1 1/2 to 2 minutes until they are soft, warm, and will not break apart when being filled. Put enough chicken mixture into each tortilla so it takes up about 1/3 of the tortilla. Then ROLL up the tortillas like burritos. If you aren't able to roll them, you can fold them like I did--like tacos. They taste the same. :D


Once you have 2 or 3 layers (enough to mostly fill the baking pan), using all the filling.


Then, get out a small saucepan (another term). Put a 1/3 cup of butter into the pan. Put the pan on medium high, and wait for it to melt completely.


It should look like this when it is melted.
Then put in two tablespoons of the gluten free flour shown above (cornstarch may work also but this flour is best). Whisk the two together completely until lumps disappear.


Once it is mixed, it looks like this:


Add 2 cups of chicken broth. If you don't have chicken broth, you can use water but you MUST add flavors like garlic powder, salt, pepper, etc to add in the tastiness.

Once the mixture has thickened, add one to two cans of chopped green chilis. Any brand will do. You will know it is thick when it starts to bubble and look like yogurt consistency. The actual term for thickened is reduced.


Whisk in the chilis to the thickened mixture.


Add two cups of plain greek yogurt. The original recipe called for sour cream but we like to eat healthy and greek yogurt tastes better, has more protein and loads less fat. The texture is nicer also, creamier.


With everything added, it should look like this, and smell delicious.


Pour the mixture over your filled enchiladas so it covers the entire top evenly.


Finally, add enough cheese to cover the top. We like a lot of cheese. You can use any kind but we prefer the Mexican cheese shredded blend. Monterey Jack or Cheddar are also good.


Cook at 350 for 20-25 minutes until cheese is melted and bubbling. Then broil for 3 minutes to get that cheesy crust on top.


Serve the deliciousness and eat another yummy gluten free meal!!


Let me know if you try it! and what gluten free meals you have made this week.

Saturday, May 18, 2013

I Got Some Cool Products!!

This week I got a shipment from one of my new blog fans who sent me products she had received from her local food bank and did not need. Here's what we got!


So, right now I'm going to eat the granola she sent, and get to the flour and cake later on. Thanks for the stuff! ;) Look for my reviews a little later on.... Off to eat some nom nom nom.

Foolproof Gluten Free Spaghetti a Kid Can Make!


Hey, sorry for being gone so long! I'm back from a busy week of middle school. If you've been following, I've talked so far about eating out and breakfasts. Now on to DINNER.

Today, I'm making spaghetti! I love spaghetti night, and first off I will recommend the best gluten-free spaghetti out there, that doesn't mush or have a bitter taste. Trust me, over the last 11 years, we've tried tons of brands. Some have been pretty awful.


If you can't read the brand name, it's Tinkyáda Brown Rice Pasta. We use fettucini because it is thicker and holds up better with the sauce. For us, we're fortunate to find it at WalMart for about $4.00 per package. 

Also, here is the meat we use:


We like to use this Italian sausage, but you can use ground beef if you want. By the way, here are the ingredients: PORK, WATER, CONTAINS 2% OR LESS OF: CORN SYRUP, SALT, SPICES, SUGAR, PAPRIKA, GARLIC POWDER.


We usually mix two packages of ground sausage, one Italian and one Hot, and there are other varieties, like Country and Sage. This is about three pounds of sausage, but we have 5-7 people to feed and they eat a lot.


So, to start off, get a big pot and fill it about 2/3 of the way, with a little bit of salt. Put it on the stove and put it on a high temperature.


So, while you have this on the burner, start working on the sausage. By the way, you want the water to be at a rolling boil (remember?) before you put the pasta in.


For the sausage, get out a large pan. We use a non-stick skillet. Put your meat into the pan on medium-high (between high heat and medium heat). 


Split up the sausage into pieces with a spatula. My sister splits it up into very small pieces, but I like to split it up into bigger pieces, like small meatballs. 


Once the meat is partially browned, turn you burner down to medium heat.

If your water is boiling right now, put the spaghetti in. This brand calls for 11 minutes. MAKE SURE TO STIR OR ELSE YOUR SPAGHETTI WILL BE REALLY CLUMPY! 

Back to sausage. If you're sausage looks 95% browned, turn the heat down to the lowest heat you can without turning it off. Then add some pasta sauce (we use the HUNTS below because it has really great flavor). We add two pounds (two cans) of sauce, but, again, we have at least 5 people and three pounds of sausage. This 2:3 ration between sauce and sausage is really good. The sausage will cook 100% done with the sauce while your pasta is cooking.


Once your pasta is done, dump it into a strainer for a minute to drain completely, separate the noodles with a pasta spoon, then serve with sauce and enjoy!


What have you tried cooking gluten free this week? Have you had good luck or bad luck with pasta?

{This recipe was included in the Gluten Free Wednesdays Carnival here:}